Caravanning Tips
After towing a van for many years, I have a few tips that may be of interest,
especially to newcomers to 'The Good Life'.
If you need further information, or have any comments, you can e-mail me at norm@hotkey.net.au
Click on an item that interests you.
Item 1 Filtered
Water.
Item
2 Wind down Levelling jacks.
Item 3 Levelling pads
and wheel chocks.
Item 4 Levelling the
caravan on site.
Item 5 Reversing
guides.
Item 6 Wing
Mirrors.
Item 7 Workbench
.
Item 8
Jockey wheel or Jockey plate? .
Item 9 Drain
pipe.
Item 10 Laundry
Item 11
Wardrobe.
Item 12 Fridge.
Item 13
Cupboards.
Item 14 Make a false
floor for station wagons.
Item 15 Before
leaving on a trip.
NOTE!
Click on thumbnails for full size pictures
Item 1 Filtered
Water.
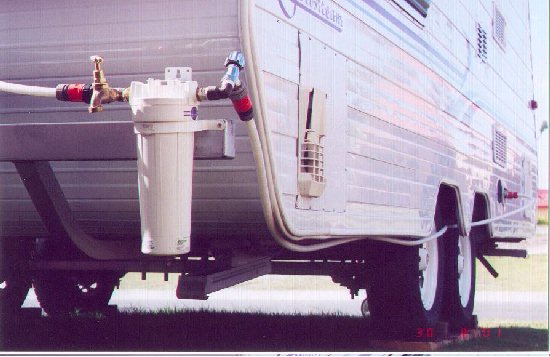
Caravan park water supplies are not always as good as
we'd like them to be. Putting a filter unit in the line from the caravan park
hose connection is a simple method of ensuring a supply of filtered water. In
our system we use food grade hose and a pipe support bracket on the bumper bar
to hold the filter.
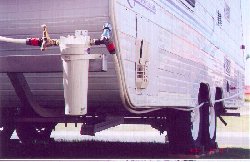
The filter is a Raindance with a 0.5 micron filter. This
level of filter is claimed to remove the parasites giardia and cryptosporidum
that were the cause of the Sydney water supply problem in June 1998. A hose tap
upstream from the filter is a useful outside tap for washing hands etc. The
cistern cock downstream from the filter allows you to disconnect the downstream
hose to fill personal drinking water bottles or containers etc. Before leaving home,
the water storage tanks are filled with filtered water. Since these tanks are
only used during breaks when we are travelling, there is sufficient filtered water
for several weeks.
The unit is easily removed ready for travelling and after returning home.
The filter can be used to make your own bottled water.
Note! The Raindance unit has instructions that the inlet and outlet have
tapered threads and should only be used with tapered thread fittings. I used
normal thread fittings with teflon tape, but care must be taken when inserting the
fittings to avoid damaging the plastic tapered threads.
Click here to return to Top of this
page
Item 2 Wind down levelling
jacks.
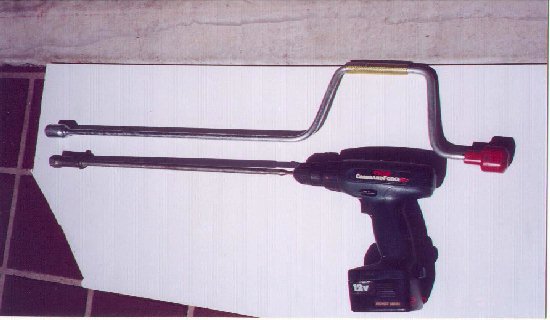
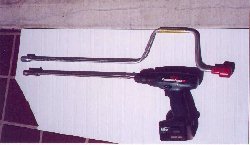
First, I strongly recommend that the cranked winder for
the levelling jacks which was supplied with the caravan, is modified to make it
fit into a cordless drill.
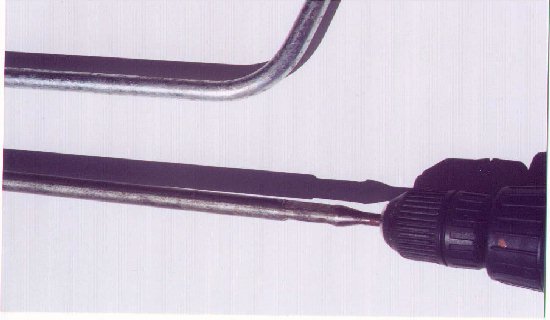
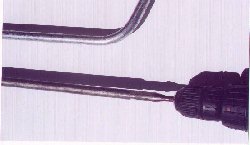
Cut off the cranked offset, leaving only the straight section. Next, grind
down the shaft until it fits into the chuck of the cordless drill. Be sure to
grind down evenly to ensure it spins evenly in the drill. If you can get it
turned down in a lathe, that would be a preferred method. It is advisable to
also grind two flats near the turned end, to allow a spanner to be used to turn
the shaft if the drill battery is dead. (See the picture on the right.) I haven't yet found myself without
sufficient power left in the battery, but I have found on several occasions, I
have just enough power to do the job.
The rod I'm using on my current van is an old rod from a previous caravan with a socket
spanner from the lawn mower spark plug bolted to the end, so it wasn't necessary to cut the winder
on the new van.
On our current van, it takes 100 revolutions to move the jack from the
horizontal stored (travelling) position, through 90 degrees to a vertical
position. Normally the jack would probably need to be wound down to somewhere
between 30 to 60 degrees. If the average is 45 degrees, the cordless drill saves
me an average of 50 turns on each of the four jacks, down every night and up
every morning. I have much better things to do with my time when I arrive at a
campsite, such as sitting with my feet up sipping something cold.
If the jacks are not wound down hard, slight rocking on the wheels each time
someone walks around the van will soon make the van shake with every movement.
The bearing plates on the jacks are usually only suitable for bearing on a
hard surface such as concrete.
If possible, a selection of pieces of timber should be carried, they will be found to be very useful, especially for levelling up the caravan when the site is out of level.
I consider it is absolutely essential to carry
with me a few spare pieces of timber. Boards which are about 15mm thick are
satisfactory, about 150mm or 200 mm square. If these timbers
are 50 or 75 mm thick (preferably softwood to minimize weight), perhaps about the size of a brick, it saves winding
the jacks down quite so far each time.
Also, unless you have proper axle supports, it is prudent to carry enough thick
pieces to make a stable support under the axle in the event that you need to
move the jack after removing a wheel. The 50 or 75mm thick pieces can double for the
axle supports. If you have two axles, you need double the quantity of packers.
I also carry a piece of flat board about 450mm x 300mm approximately. This is
a piece I use under the jockey wheel. (A) to prevent it digging into the grass
and (B) to allow me to slew the 'van to the left or right to line up with the
trailer ball when hitching up. These timbers are also useful as levelling pads
when the site is not level.
Click here to return to Top of this
page
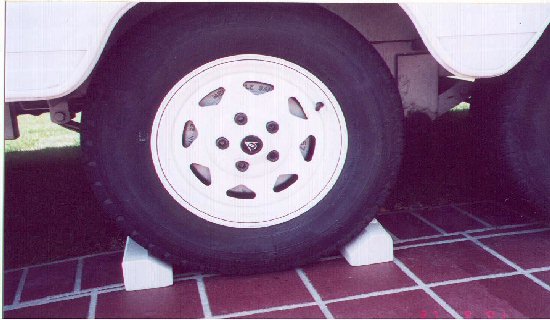
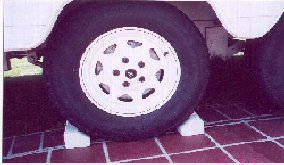
Item 3 Levelling pads and wheel
chocks.
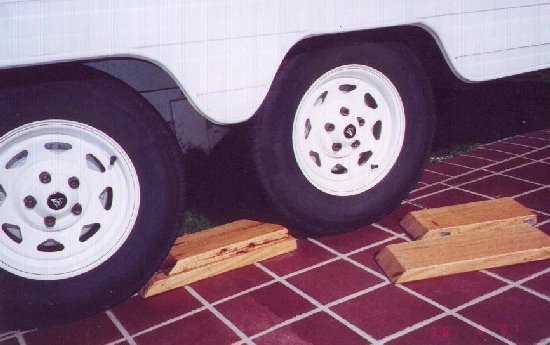
Levelling pads and chocks are essential. It is worth
spending time making up a few good pieces of equipment that are suitable for
your van. If they are coated with linseed oil or painted, they will resist
absorbing rainwater, can be easily cleaned after use and will last for years.
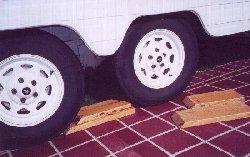 Two pads, each about 35mm thick should be enough to solve most 'out of level'
sites, but if you're van has double axles, you need double the quantity. With
double axles, make sure at least two of the pads are not too long to fit between
the wheels as shown in the photograph on the left.
Two pads, each about 35mm thick should be enough to solve most 'out of level'
sites, but if you're van has double axles, you need double the quantity. With
double axles, make sure at least two of the pads are not too long to fit between
the wheels as shown in the photograph on the left.
 Chocks to stop the wheels moving when parked are also essential, as the
caravan hand brake should never be relied on to hold the van.
Four chocks are required to put in front and behind both the left and right wheels.
Ensure this is done BEFORE unhooking the van. I'll refer to this later in the
'levelling on site' tip.
Chocks to stop the wheels moving when parked are also essential, as the
caravan hand brake should never be relied on to hold the van.
Four chocks are required to put in front and behind both the left and right wheels.
Ensure this is done BEFORE unhooking the van. I'll refer to this later in the
'levelling on site' tip.
Click here
to return to Top of this page
Item 4 Levelling the caravan on
site.
This is the best procedure that I recommend for levelling
up the caravan when I arrive at a site To prevent the nuisance of doors swinging
open or shut because the van is out of level and to prevent the van rocking
every time someone moves about, it is worth taking the little time necessary to
get the van reasonably level and rigid.
Basically, it means levelling the van, then lowering the front slightly
before lowering the rear jacks, then wind up the front again to put pressure on
the rear jacks to ensure they are firm, then lower the front jacks.
This is the detailed safe sequence.
After I have parked the van in the correct position, and WHILE IT IS STILL
HOOKED ON TO THE CAR I first check that the left and right wheels of the van are
sufficiently level with each other. If I find that one wheel is in a hollow,
this is the time to put down a levelling pad or two behind the wheel so that I
can drive the van backwards onto the levelling pads.
NOW THIS IS THE MOST IMPORTANT BIT.
Whether a wheel is up on pads or not, the possibility exists for the van to
move while it is being unhooked and can even roll off the pads, therefore, WHILE
THE VAN IS STILL HOOKED ON TO THE CAR, put chocks in front and behind both the
right and left van wheels to prevent the van moving when you unhook the car. The
caravan hand brake is often not enough to stop the van moving, if it moves only
an inch or two while being unhooked it can cause serious damage to you or the
car. Having your fingers jammed between the van and the tow ball can seriously
ruin your day. You will surely 'spit the dummy" and you will turn into a really miserable person. Not "A Happy Camper".
After unhooking the car, cable and chains and moving it out of the way, I use
the following procedure.
1. Wind up the jockey wheel until the van is approximately level. I use a
200mm spirit level resting on the 'A' frame, to ensure the van is level front to back.
2. When the van is level, wind down the jockey wheel one or two turns. Now
the van is slightly out of level, with the front being lower than the back.
3. Lower the back levelling jacks on to the bearing pads, as far as they will
go.
4. Wind up the jockey wheel to ensure the van is level again. (Now there is a
great deal of load on the back levelling jacks, much more than you can put onto
the jacks by winding them down. This ensures the van is rigid and doesn't rock
every time someone moves.)
5. Now lower the levelling jacks in the front of the van as far as they will
go.
6. Wind down the jockey wheel one turn. This takes the load off the jockey
wheel and puts more load onto the front jacks.
The van is now level and rigid and will not shake even if you stay on that
site for some time.
Winding up the jacks ready to tow away from the site.
The load on the jacks is too great to unwind the jacks without first
releasing the load with the correct use and sequence of the jockey wheel
1. Wind the jockey wheel up to lift the front of the van and take the weight
off the front levelling jacks.
2. Raise the front levelling jacks to the stowed away towing position.
3. Wind down the jockey wheel to lower the front of the van, (raising the
back of the van), taking the weight off the back levelling jacks until they are
clear of the bearing plates.
4. Raise the back levelling jacks to the stowed away towing position.
5. Check the approximate height of the towing ball against your leg. (Level
with your knee, or a little higher, or a little lower depending on your
particular vehicle.)
6. Wind up the jockey wheel until the hitch is about the correct height when
measured against your leg, but leave the hitch a little higher than the towing
ball. When you reverse to the hitch, you need the hitch to be higher than the
towing ball allowing the ball to pass underneath the hitch.
7. Leave the chocks under the wheels until the van is properly hitched on to
the car and the van hand-brake is released.
8. When the van is properly hitched to the car, switch on hazard lights to
ensure connection is made to the rear lights housing. Remove chocks and check
all clearance and brake lights and indicators.
9. Release hand brake. Check around the area for tools etc.
10. After moving away from the site, stop, get out and check that all chains
and connections are sound.
Click here
to return to Top of this page
Item 5 Reversing guides.
 A simple pair of reversing guides can be made from some off cuts of aluminium and
plastic rainwater pipe. The guides need to be long enough to be visible through the
rear window of the vehicle. 900mm is suitable for my Ford sedan.
On the van, I use an off cut of 90mm PVC pipe, cut to fit snugly around the hitch handle
and a piece of aluminium angle, flattened out a bit, to securely fit the curve of the pipe,
then pop riveted to the pipe. On the car, a convenient slot in the Hayman Reese hitch takes a press-in piece of
flattened aluminium angle. The guides take very little space when stowed, and
make it easy to accurately line up the tow ball and hitch when reversing.
A simple pair of reversing guides can be made from some off cuts of aluminium and
plastic rainwater pipe. The guides need to be long enough to be visible through the
rear window of the vehicle. 900mm is suitable for my Ford sedan.
On the van, I use an off cut of 90mm PVC pipe, cut to fit snugly around the hitch handle
and a piece of aluminium angle, flattened out a bit, to securely fit the curve of the pipe,
then pop riveted to the pipe. On the car, a convenient slot in the Hayman Reese hitch takes a press-in piece of
flattened aluminium angle. The guides take very little space when stowed, and
make it easy to accurately line up the tow ball and hitch when reversing.
Click here
to return to Top of this page
Item 6 Wing Mirrors.
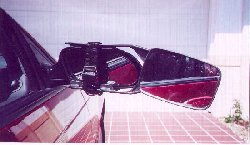 After losing many clip-on wing mirrors to the wind force from trucks passing very close at high
speed, I resorted to tying the clip-on to the car mirror with a piece of plastic
coated wire. I have now found a small fabric dogs collar with press in plastic
fittings which does a neat job of securing the mirror to the car mirrors.
After losing many clip-on wing mirrors to the wind force from trucks passing very close at high
speed, I resorted to tying the clip-on to the car mirror with a piece of plastic
coated wire. I have now found a small fabric dogs collar with press in plastic
fittings which does a neat job of securing the mirror to the car mirrors.
Click
here to return to Top of this page
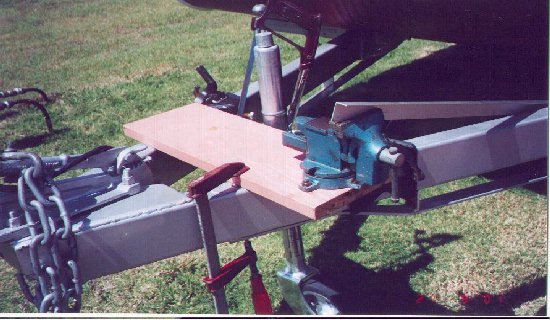
Item 7 Workbench
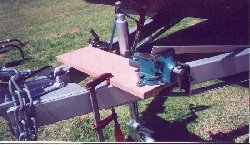 A Vyce bolted to a piece of timber 600mm X 200mm X 25mm thick then clamped with an 'F' clamp to the "A" frame tight up to the jockey wheel makes a very useful rigid workbench. A small curved recess in the edge of the 'bench' to fit tight against the jockey wheel tube, helps to keep the 'bench' rigid.
Click
here to return to Top of this page
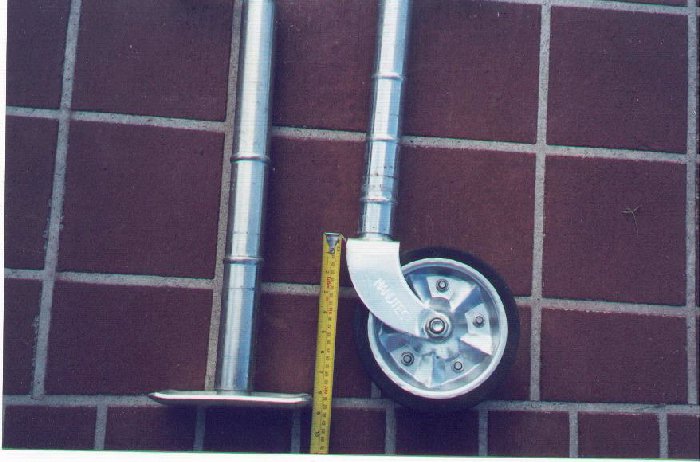
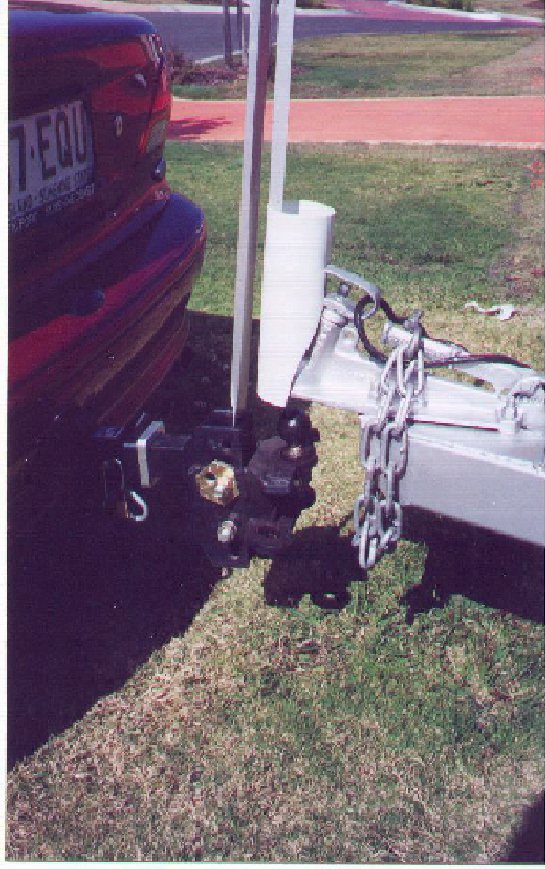
Item 8 Jockey wheel or jockey plate?
 The jockey wheel supplied with our current van has a large 200mm diameter wheel. The
Ford Falcon we use for towing seems to be rather low at the tow ball, especially
when the heavy Hayman Reece hitch is connected. Also, on many
sites, we have found that the car rear wheels are in a depression or drainage gutter,
just where the car has to be parked to be hitched to the van.
When the jockey wheel is wound down as far as possible, until the outer
sleeve rests on the wheel mounting, it is often too high to allow
connection to the towing ball.
The jockey wheel supplied with our current van has a large 200mm diameter wheel. The
Ford Falcon we use for towing seems to be rather low at the tow ball, especially
when the heavy Hayman Reece hitch is connected. Also, on many
sites, we have found that the car rear wheels are in a depression or drainage gutter,
just where the car has to be parked to be hitched to the van.
When the jockey wheel is wound down as far as possible, until the outer
sleeve rests on the wheel mounting, it is often too high to allow
connection to the towing ball.
I have overcome this by using a jockey plate instead of the wheel.
The outer sleeve of the jockey plate, (the part that is contained within the 'A' frame bracket), can be wound down 200mm lower than the outer sleeve of the jockey wheel.
Since using the plate, I have had no problems, regardless of site levels. With
double axles, the jockey 'wheel' is largely redundant as it is impossible to
slew the van while resting on the jockey wheel, as is possible with a single
axle.
Click
here to return to Top of this page
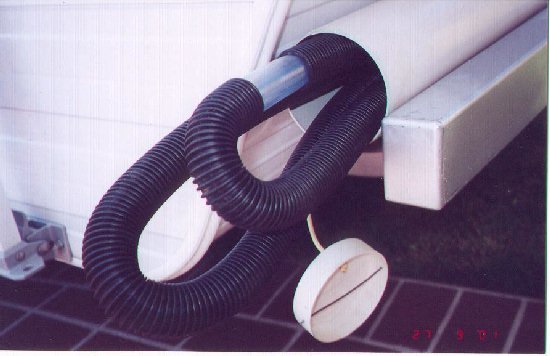
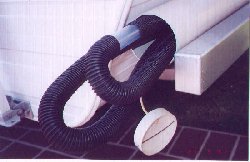
Item 9 Drainage pipe.
The drain pipe from the kitchen sink to the sullage drain often lays along the
ground for a few metres, then has to be raised a little over the rim of the
drain to allow the waste water to empty into the sullage drain. When the water
has drained, some water remains in the pipe until the next time it is used.
However well the pipe is drained, the remaining water will contain food
particles, congealed fat etc. however small, which is highly fertile ground for
bacteria to colonize.
 When leaving the site, try to ensure the outside pipe is flushed out as well
as possible and when the pipe is stowed away for travelling, ensure the ends of
the pipe are connected to each other to form an endless sealed loop.
This doesn't stop the bacteria from multiplying, just confines them to the inside of
the pipe. If possible, the pipe should be carried in a separate container. A 100 mm
diameter pvc pipe at the back or front of the van can carry a length of 8 metres
of the black corrugated 25mm pipe, in a continuous loop. It's a tight fit so I use the TV antenna mast to push the folded pipe into the tube. It's also a convenient place to stow the TV mast.
When leaving the site, try to ensure the outside pipe is flushed out as well
as possible and when the pipe is stowed away for travelling, ensure the ends of
the pipe are connected to each other to form an endless sealed loop.
This doesn't stop the bacteria from multiplying, just confines them to the inside of
the pipe. If possible, the pipe should be carried in a separate container. A 100 mm
diameter pvc pipe at the back or front of the van can carry a length of 8 metres
of the black corrugated 25mm pipe, in a continuous loop. It's a tight fit so I use the TV antenna mast to push the folded pipe into the tube. It's also a convenient place to stow the TV mast.
To sterilize the pipe, consider the following procedure.
After flushing out the pipe, hold the two ends together to ensure that what
is poured in one end, doesn't run out the other end. Pour into the pipe some
detergent and some disinfectant or bleach, then add a few litres of water.
Connect the ends together to form an endless loop, and vigorously shake the pipe
to ensure the fluids are mixed well and the mixture is distributed thoroughly
throughout the full length of the pipe. Leave the mixture in the pipe while
travelling, the vibration will continue to disburse the mixture thoroughly to
sterilize the pipe and you can start the next site with an odourless drain pipe.
Vans don't normally have the advantage of a 'U' shaped water seal under the
sink as is usual in domestic kitchens and bathrooms, accordingly, it is a good
idea each night, to pour a small amount of disinfectant down the sink and leave
the plug in to prevent the disinfectant evaporating, this will hep to prevent
bacteria colonizing in the van drainage system.
Click
here to return to Top of this page
Item 10 Laundry
Laundry
is a daily chore and must be kept under control. Do it daily. Give it the
priority it deserves, otherwise, it becomes a major time consuming project every
few days.
We find that drying the clothes rather than washing them is the activity that
can cause inconvenience.
Be frugal in your use of fresh clothes. It isn't necessary to wear dirty
clothes, but some restraint can be practiced. Using things a little longer than
you would at home can cut out unnecessary laundry.
Choose easily laundered clothes where possible, drip-dry rather than items
that need ironing.
Use thin towels rather than thick towels. Two thin towels are easier to wash
and although they need more drying space, will dry much quicker than one thick
towel. You can still carry a few thick fluffy towels to use when good drying
conditions are available.
Washing can be done while travelling. We carry a 10 litre and a 20 litre bucket with
press on lids. Put in some laundry detergent and enough water to cover the
clothes. Stir up the water to ensure the detergent is mixed thoroughly, and then
loosely drop in the clothes. Don't pack too many items into one bucket. Make
sure there is enough space for the clothes to move around freely.
While travelling, I store the bucket jammed up against other equipment in the
boot of the sedan, or in the back of the wagon. With station wagons, I have used
a stretch hooked strap, wrapped around the bucket and hooked to the tie down
bracket. The new caravan has a boot in the front which conveniently carries the
'washing machine'.
The gentle vibration during travelling gets the clothes as clean as any
washing machine. As the drying of the clothes is the critical activity, as soon
as possible when we arrive at our destination, we rinse out the clothes and hang
them out to dry. We find that one bucket is usually enough for two people. We
use the second bucket for bed sheets. Except during long periods of rain, we
rarely need to use the caravan park washing machines or dryers.
We have used this method for over 30 years and travelled many thousands of
Kilometres. (In one year alone, we covered 17,000 Klms). We have never had an
'accident' of water spilling.
Under the front window stone guard, we have put three drying lines. I drilled
three small holes in each edge of the guard and threaded a thin line through the
holes to make three lines, each more than five feet long. This gives us more
than 15 ft of line. These lines are often enough to dry towels, T shirts etc.,
and also they are under cover from light rain.
We have a shower/toilet cabinet. I have screwed cup hooks into the walls near
the roof and strung a line right around the cabinet. If there are any clothes
that are not quite dry when we are ready to move off, we hang them in the
cabinet while we are travelling. Since the walls are waterproof, no harm is done
if the clothes are damp when hung up. I don't know whether it is the warm air in
the cabinet generated by the sun on the roof skylight, or the vibration while
travelling, producing slight air currents, but most clothes are dry by the time
we have reached our destination.
Click
here to return to Top of this page
Item 11 Wardrobe.
Many people have
trouble with clothes falling off the hangers on the hanging rails in the
wardrobes. A small piece of plastic coated wire to tie all the hangers together
in a bunch is better than nothing.
Alternatively, fix to each rail, a piece of aluminium right angle similar to the shape
of a figure seven, (7) approximately 50mm in the vertical leg and 30mm in the
horizontal leg would be suitable. The horizontal leg rests on top of the rail
and is screwed to the rail. The vertical leg has a series of 3mm holes drilled
near the bottom big enough to take each individual hanger and located about 30mm
apart. Each hanger is secure and does not move while travelling.
We use spring clip hangers for trousers, rather than fold them over the cross
bar of the hanger.
Click
here to return to Top of this page
Item 12 Fridge.
Use an office stationery bulldog clip to secure the top of the opened milk
cartons.
Lay a heavy towel over the items that are on the shelves, tucked in where
possible to prevent them moving.
Click
here to return to Top of this page
Item 13 Cupboards.
Use bulldog clips to
seal potato chip packets and cereal packets etc.
Delicate wine glasses don't travel well. But they can be carried safely if
turned upside down and placed into expanded polystyrene stubby holders/coolers.
Heavy objects such as electric fry pans, fans, heaters etc. can slide about
and cause damage to gas and water lines.
Putting the appliances in boxes, or lining the shelves with non-slip matting
can prevent the sliding.
If there is a lot of space on the shelves, allowing the appliances to move
around, the space can be filled up with small empty cardboard boxes such as
cereal boxes etc.
In the lower cupboards, we set up a system of rails and slide out baskets.
First, get plastic baskets the right width to pass through the cupboard
doors. The baskets I used were 'Handy Baskets' from Coles. The biggest basket I
used, (almost as big as the van kitchen sink), only cost around $4.00. The
smallest, for a very narrow and deep cupboard was only $2.00. This particular
cupboard was largely useless as reaching into the back of it was virtually
impossible. Now we can get at its contents easily.
To make sliding rails, we fixed two pieces of aluminium angle, resting on one
end on the threshold of the cupboard door, while the other end sloped downwards
and was screwed to the floor. The distance apart was determined by the size of
the baskets. The baskets slide easily along these rails. Storing items in
baskets, not only stops objects such as tall containers that should be kept
upright, from falling over, and rolling around, but also allows appropriate
items (for instance all the vegetables), to be kept together in one easily
accessible basket. Also, you can arrange that the least frequently used items
are stored in the back, and the most frequently used items are stored nearest
the front of the cupboard.
If you need something from the front basket, it can usually be reached from
the open door. When a less frequently used item is required, the front basket
can be easily slid out to reach the back basket.
Allow me to digress from just mentioning my tips. I must elaborate here.
In respect of the 'sliding basket and rails' project, I have to say that when
this project was completed, we were absolutely amazed at how easy it became to
get our hands on things that are stowed in the back of the cupboards, compared
to the struggle we had before. Previously, we had to stoop down or get down on
our (aging) knees. Then we had to try to lift little boxes up over the threshold
of the cupboard door to reach something which in my kneeling position was beyond
arm's length in the back of the cupboard.
Invariably, this was necessary while trying to get on with the cooking, so
while crouched down there, I was ever conscious of the stuff boiling away on the
stove above my head.
We never realized how much of an inconvenience and how much difficulty was
involved in getting at the back of the lower cupboards.
I must also mention that we are pleasantly surprized how keeping things
neatly stored in its relevant basket has generated much more space in our
cupboards. It is definitely one of the more successful little projects I have
ever thought of. We wouldn't be without the sliding baskets system now. I can
thoroughly recommend this project if your van has cupboards where drawers would
be more suitable.
In a cupboard that has a door close to the wall, we have fixed a curtain
spring to the wall suitable to hold plastic bottles of dish washing liquid,
detergent and cream cleaner and insect spray containers etc. in an upright
position. The spring is loose enough to push the bottles in between the spring
and the wall, but tight enough to prevent them from moving around.
Line shelves with non-slip plastic cloth to prevent loose items sliding
about.
If possible, plates and saucers should be stacked on edge, rather than one on top of another. We use a plastic sink drainer, which has been cut down to fit into a pot drawer. If plates and saucers, desert bowls etc. are stacked on top of each other, the
coarse textured base of each plate is sufficiently abrasive when combined with
the vibration of travelling, to scratch the surface glaze of the plate below.
We put a paper towel between them or preferably, use off-cuts of the non-slip
'cloth'.
Click
here to return to Top of this page
Item 14 Make a false floor for station
wagons.
Use two 150mm x 15mm boards on edge for the supports. These will be placed
from the back of the seat to the door and placed in a position to split the
floor into 3 equal width compartments. To prevent these supports damaging the
existing carpet by digging into it and leaving a permanent groove, fix the
support boards onto a piece of timber, say 75mm x 15mm in the shape of an
inverted T
The false floor can be made of light ply wood. Don't try to make the floor in
one piece, it is too difficult to take in and out. It is much easier to split
the floor across it's width making a front piece and a rear piece.
The new floor can be covered with an off-cut piece of carpet of similar
colour to the main floor carpet. The 170mm deep compartments under the false
floor is a place to stow out of sight, any items which should not be left in
view and is deep enough to take quite a lot of equipment including tool box,
cameras, etc. Stow most frequently needed items nearest to the back door for
easy accessibility.
Click
here to return to Top of this page
Item 15 Before leaving on a trip.
Don't
leave the vehicle service or modification or repairs until the last day before
leaving. It is better to use the vehicle for a day or two after the work is done
to allow any problems to show up while you are in your home area, rather than
when you are 'on the road'. On one of our trips, a mechanic had omitted to
replace a radiator clip securely, resulting in a major repair job, causing us to
be stranded for a few days. His mistake would have been discovered without
causing a major problem if I had used the car for a few days after having the
work done.
Check the towing system. On one occasion, I discovered by extreme good
fortune, that the factory fitted tow bar had four of the six bolts missing. The
remaining two bolts had the nuts missing and were only just still in the
boltholes. This could have led to a very serious incident if one of the
remaining bolts fell out while travelling. I replaced the bolts and used Nylock
nuts. I check from time to time and now there has been no loosening, despite
some 30,000Kms of travel.
If possible, connect the fridge to 240v, at least a day before you leave, to
give it a chance to thoroughly chill before your first day 'on the road'.
Make a full list of everything you intend to take in the van and in the car.
Especially include the obvious items. Start loading the van a few days earlier
if possible. Don't tick items off your list until you are satisfied the items
are stowed away in the car or van
This is a suggested list separated into van items, car items and things that
must be done before leaving.
Click
here to return to Top of this page
CHECK LIST
VAN; ADDRESS BOOK, PHONE & INSTRUCTION BOOK.
VAN; AEROGUARD & INSECT SPRAY
VAN; BED LINEN, PILLOWS, CASES & TOWELS
VAN; CAMERAS MOVIE &STILL FILMS & BATTERIES
VAN; CARDS & BOARD GAMES
VAN; CASSEROLES & MICROWAVE DISHES
VAN; CHARGERS DRILL, PHONE, SHAVER, MOVIECAMERA.
VAN; CHEQUE BOOK
VAN; CLOTHES & SHOES
VAN; CROCKERY, DISHES & GLASSES
VAN; CUTLERY, COOKING UTENSILS, BOTTLE/CAN OPENER & BBQ TOOLS
VAN; KITCHEN PAPER, CLINGWRAP, BAKING PAPER & ALUMINIUM FOIL.
VAN; LAUNDRY DETERGENT & SOFTENER, BLEACH, CLOTHES PEGS & IRON
VAN; MEDICINES BOX
VAN; RADIO & AUDIOS
VAN; REMINDER LIST OF IMMINENT, REGO, INSURANCE, MEMBERSHIP RENEWALS ETC.
VAN; SAUCEPANS & FRYPANS, ELECTRIC FRYPAN & CORD
VAN; TEA TOWELS, CHUX WIPES, DISHWASHING LIQUID & DISINFECTANT.
VAN; TOILET BAGS, MANICURE SET & HAIR DRYER.
VAN; TOILET ROLLS & TISSUES.
VAN;
VAN;
CAR OR VAN; DRILLS POWERED AND CORDLESS
CAR OR VAN; INSULATED FOOD CARRIERS, THERMOS & KNAPSACK.
CAR OR VAN; JACK FOR CAR AND VAN
CAR OR VAN; JUMPER LEADS & TOWROPE.
CAR OR VAN; MAPS INCLUDING TRANSPARENT ENVELOPES
CAR OR VAN; MINI VAC CLEANER.
CAR OR VAN; REGO AND INSURANCE PAPERS FOR VAN AND CAR
CAR OR VAN; SPARE PAIRS OF GLASSES: READING MATERIAL
CAR OR VAN; TOOL BOX,SHOVEL,AXE,DUCT TAPE,RIVET GUN,SCREWS & RIVETS BOX
CAR OR VAN; TORCH
CAR OR VAN; WRITING MATERIALS, CALCULATOR, ENVELOPES
CAR OR VAN;
CAR OR VAN;
2BDUN; ARRANGE WATERING, MOWING & COLLECTION JUNK MAIL
2BDUN; CLOSE CURTAINS
2BDUN; DIVERT MAIL OR ARRANGE COLLECTION
2BDUN; DIVERT PHONE TO MOBILE
2BDUN; LEAVE CHEQUES 2B PAID
2BDUN; SET TIMER LIGHT TO SWITCH ON EVENINGS
2BDUN; WATER INDOOR PLANTS. PUT OTHER PLANTS OUTSIDE
https://supanorm.tripod.com/caravan/tips.html
e-mail me
norm@hotkey.net.au
Updated September 2001